← All projects
Project documentation · Summer 2026

Ranbir's Spider-Man Webshooter V2

The Senior-Year Rebuild

A working, fully mechanical webshooter: no electronics, no sensors. Just spring, string, and geometry. Rebuilt from scratch in two weeks, every single day, fully solo.

Built
2 weeks, daily
Designed in
Blender
Printed in
PLA
Range
≈ 10 ft
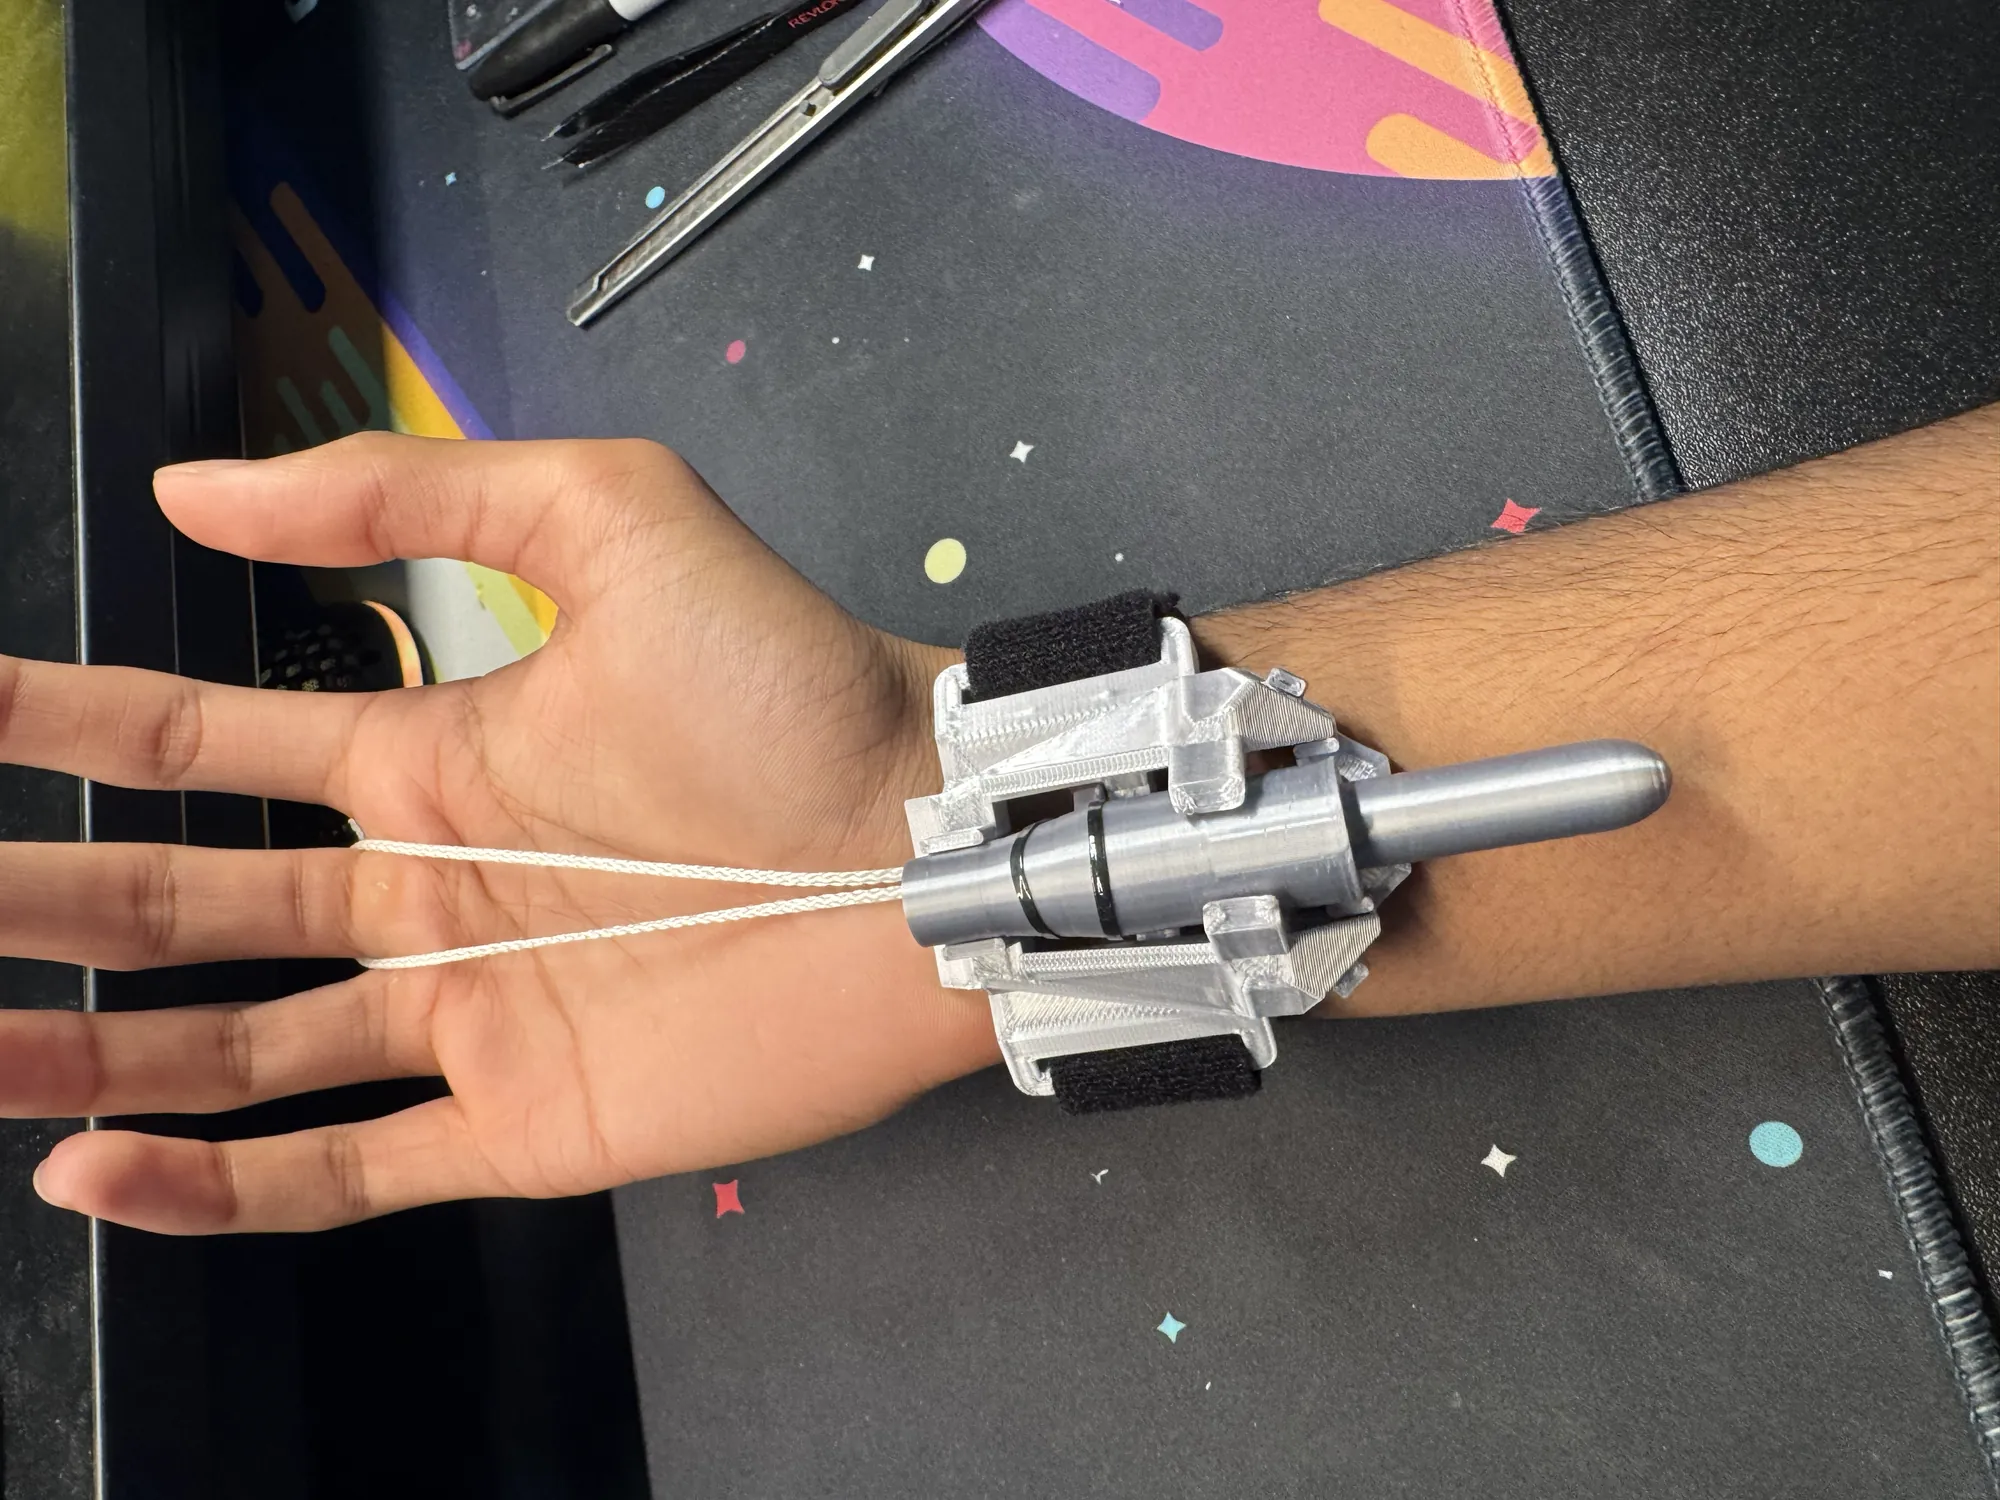
The finished V2 webshooter strapped to a wrist, with the pull strings looped around the fingers.
V2, strapped on and ready to fire.
01

The story so far

Freshman year, I built a functional Spider-Man webshooter. I had built some before high school, following YouTube tutorials using cardboard, springs, and paper. But once I got into 3D printing, I decided to redesign it from scratch in Blender: not just a prop, but a working mechanical prototype, also featuring a removable cartridge. It worked. It was built from mid-March to mid-July, working on it roughly twice a week, and it remains one of my favorite projects I've ever done.

Coming out of IB Diploma junior year, I wanted something genuinely fun to build. No rubric, no word count, just me and a printer. The timing lined up too: Spider-Man: Brand New Day comes out this summer, which made revisiting this exact project feel right.

When I went back and dug up the old freshman build, I didn't actually find many intact parts. Mostly extras, snapped pieces, and failed prints. So this rebuild started almost from nothing physical, just memory and old files.

Officially, this is “Ranbir's Spider-Man Webshooter, V2”. V2 because it's the second full official iteration of the project. Internally, each component went through its own sub-versions, but V2 marks the whole system, top to bottom.
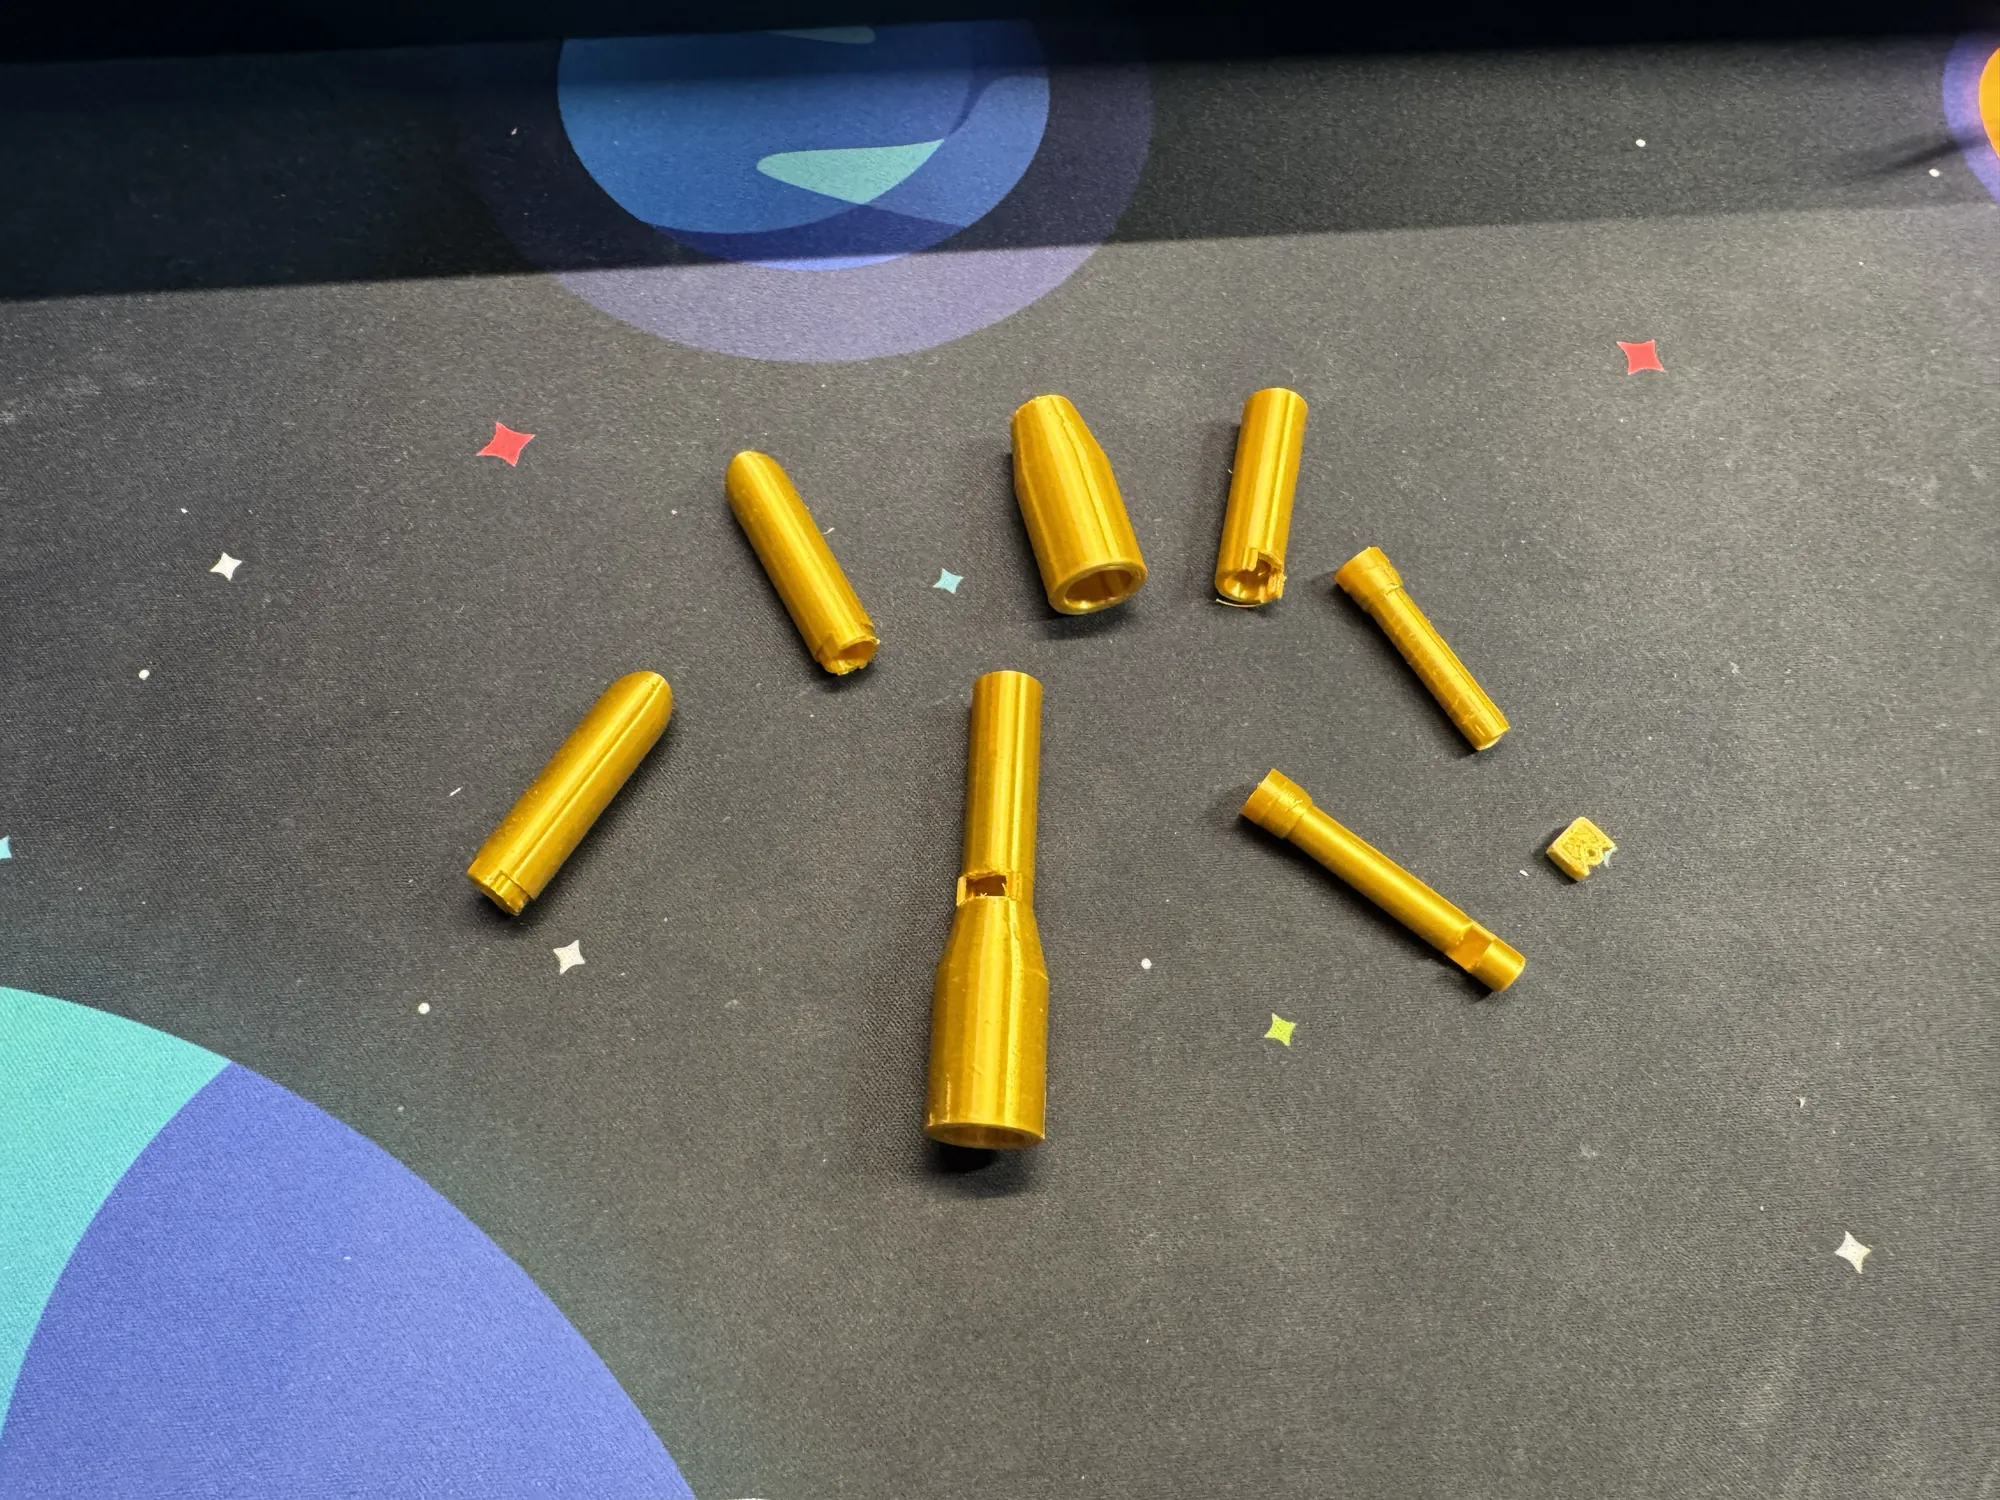
Gold 3D-printed parts from the freshman-year build laid out in an arc on a desk mat.
What was left of the freshman build: extras, snapped pieces and failed prints. (Freshman parts are the gold ones, all through this page.)
The rebuild took 2 weeks, working on it every single day, fully solo. Design, problem-solving, and troubleshooting were all mine.
02

Freshman year vs. now: how my approach changed

This is honestly the biggest difference between the two builds, more than any single part.

Freshman me

Build it all, then fix it

Had a vision for the entire webshooter, built the whole thing in one shot, printed the whole thing, and only then started solving problems. That made it brutally hard to fix issues buried deep in the design. By the time something broke, it was tangled up with five other systems.

~2 sessions a week · about four months on the calendar
Senior me

One feature at a time

Broke it down feature by feature, version by version. Each version of a part had one specific goal. I'd iterate on that version until it hit the goal, then move to the next version with the next goal.

Every single day · two weeks straight
The loop, on repeat
  1. “Let's add this feature”
  2. Design it
  3. Print it
  4. Confirm it works
  5. “Okay, now branching off this, let's tackle the next thing.”

The clearest way to see the speed-up isn't really the total time. It's the rate of work. Going from a couple of sessions a week to working on it daily is what actually let the whole redesign (five components, multiple versions each) close out in a fraction of the calendar time the original took.

That, plus genuinely being much faster in Blender and 3D modelling now, and having engineering knowledge I didn't have as a freshman (like where plastic actually needs reinforcement under spring pressure), made the difference.

03

How it works

Purely mechanical: no electronics, no sensors. Just spring, string, and geometry. Load it up and fire it yourself.

Side view of the webshooter's firing mechanism (simplified, not to scale) ≈ 10 ft effective range → cartridge bullet barrel internal cylinder pull stopper
Simplified side view, not to scale.
  1. The bullet loads in first, from the front, pushing back against the spring and compressing it. On the way in it rides over the stopper's slanted front face, pressing it down out of the way.
  2. The stopper, held in place by a rubber band, injects itself into a groove cut into the bullet, locking the bullet in place while the spring stays compressed behind it.
  3. The cartridge loads in from behind, holding the string (which is connected to a magnet), which connects to the other magnet on the bullet.
  4. Pull the string → the stopper releases → the compressed spring fires the bullet forward, with the cartridge's tethered, magnet-connected string following it out. That's the actual web-shooting visual.

Effective range: about 10 feet. Not bad for a prop running off a small compression spring.

Now the real thing

One pull. One shot.

Filmed on my own wrist. Keep your eye just above it: the bullet is out in a fraction of a second, so it's easy to miss at full speed.

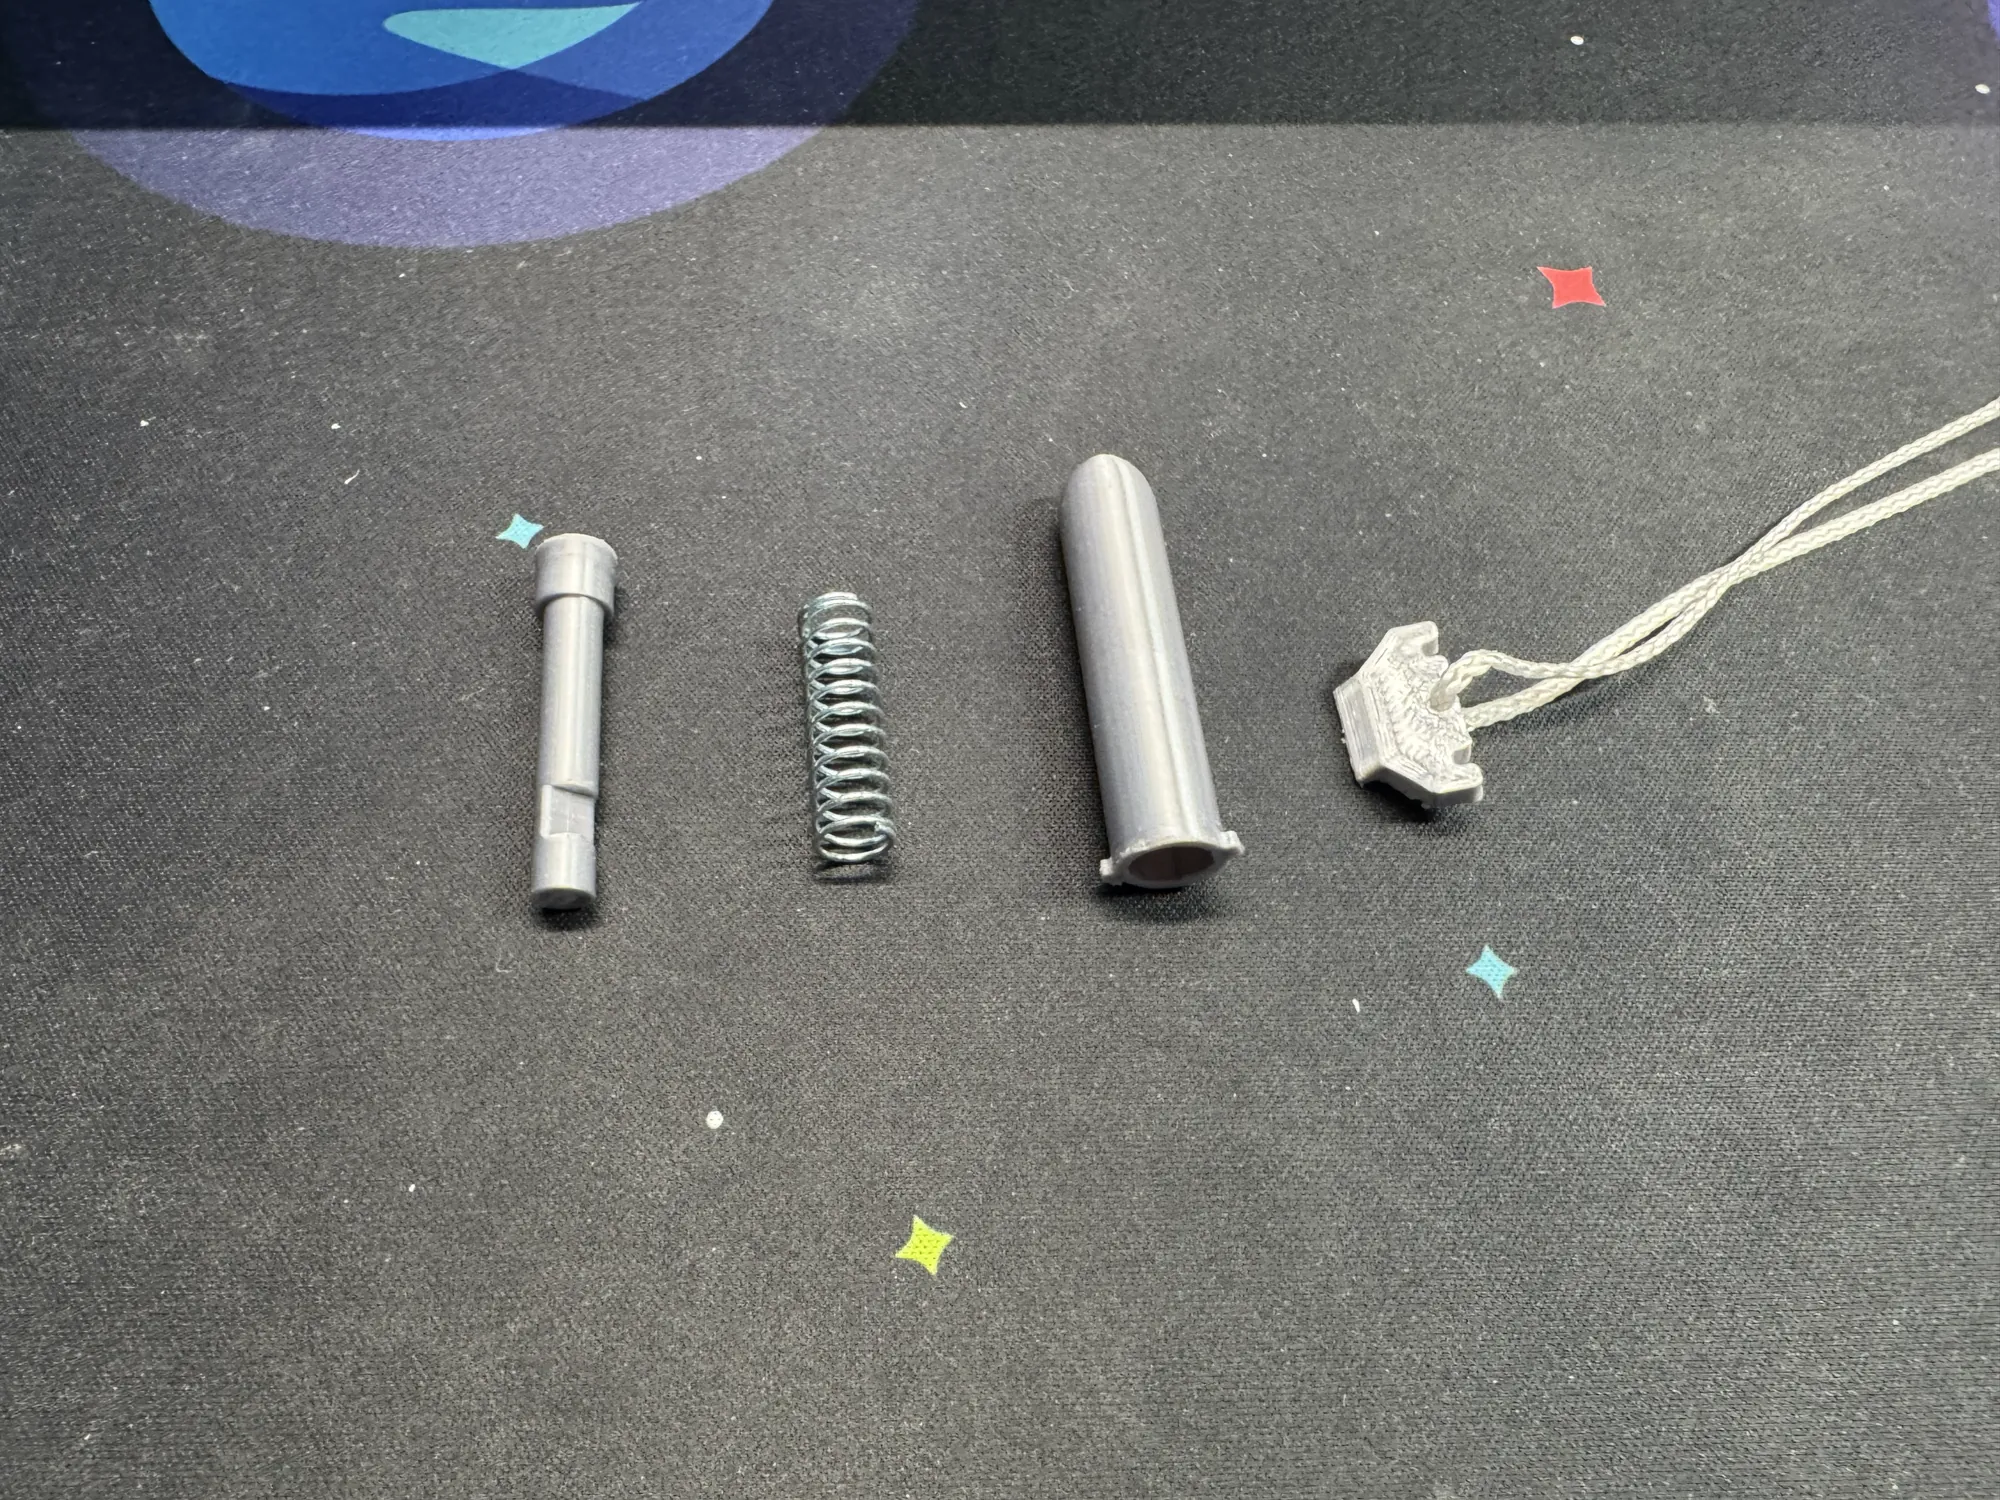
Four parts laid out left to right: the bullet rod, the compression spring, the cartridge tube, and the stopper with its pull string.
The real thing, left to right: bullet, spring, cartridge, and the stopper with its pull string.
04

Component breakdown & version history

Each part below is shown starting from its freshman-year original, through every redesigned version to the final one.

Main barrel

Freshman → v1 → v2 → v3 → v4 → v4.5 → v5 (final)

The barrel went through the most iteration of any part, since it has to hold the entire system together.

  1. Freshman

    The original 3D-printed barrel. No reinforcement built into the design, so it consistently snapped at the area where the hole for the stopper was seated.

  2. v1 & v2

    Focused purely on getting the spring to seat right: the spring catches on an internal cylinder, while the bullet passes through a hole drilled through that same cylinder. Mostly printer-tolerance testing to get the fit right.

  3. v3

    Added internal space for the new, thicker, more reliable stopper mechanism.

  4. v4

    Added a magnet-based mounting system to attach the barrel to the outer casing.

  5. v4.5

    Tested the new cartridge-locking system: moved the twist-lock grooves off the cartridge and onto the thick main barrel instead.

  6. v5 · final

    Brought everything together. Added support material and extra plastic exactly where pressure builds up under spring force, something I genuinely couldn't have known to do as a freshman. This version doesn't snap, and it's super solid.

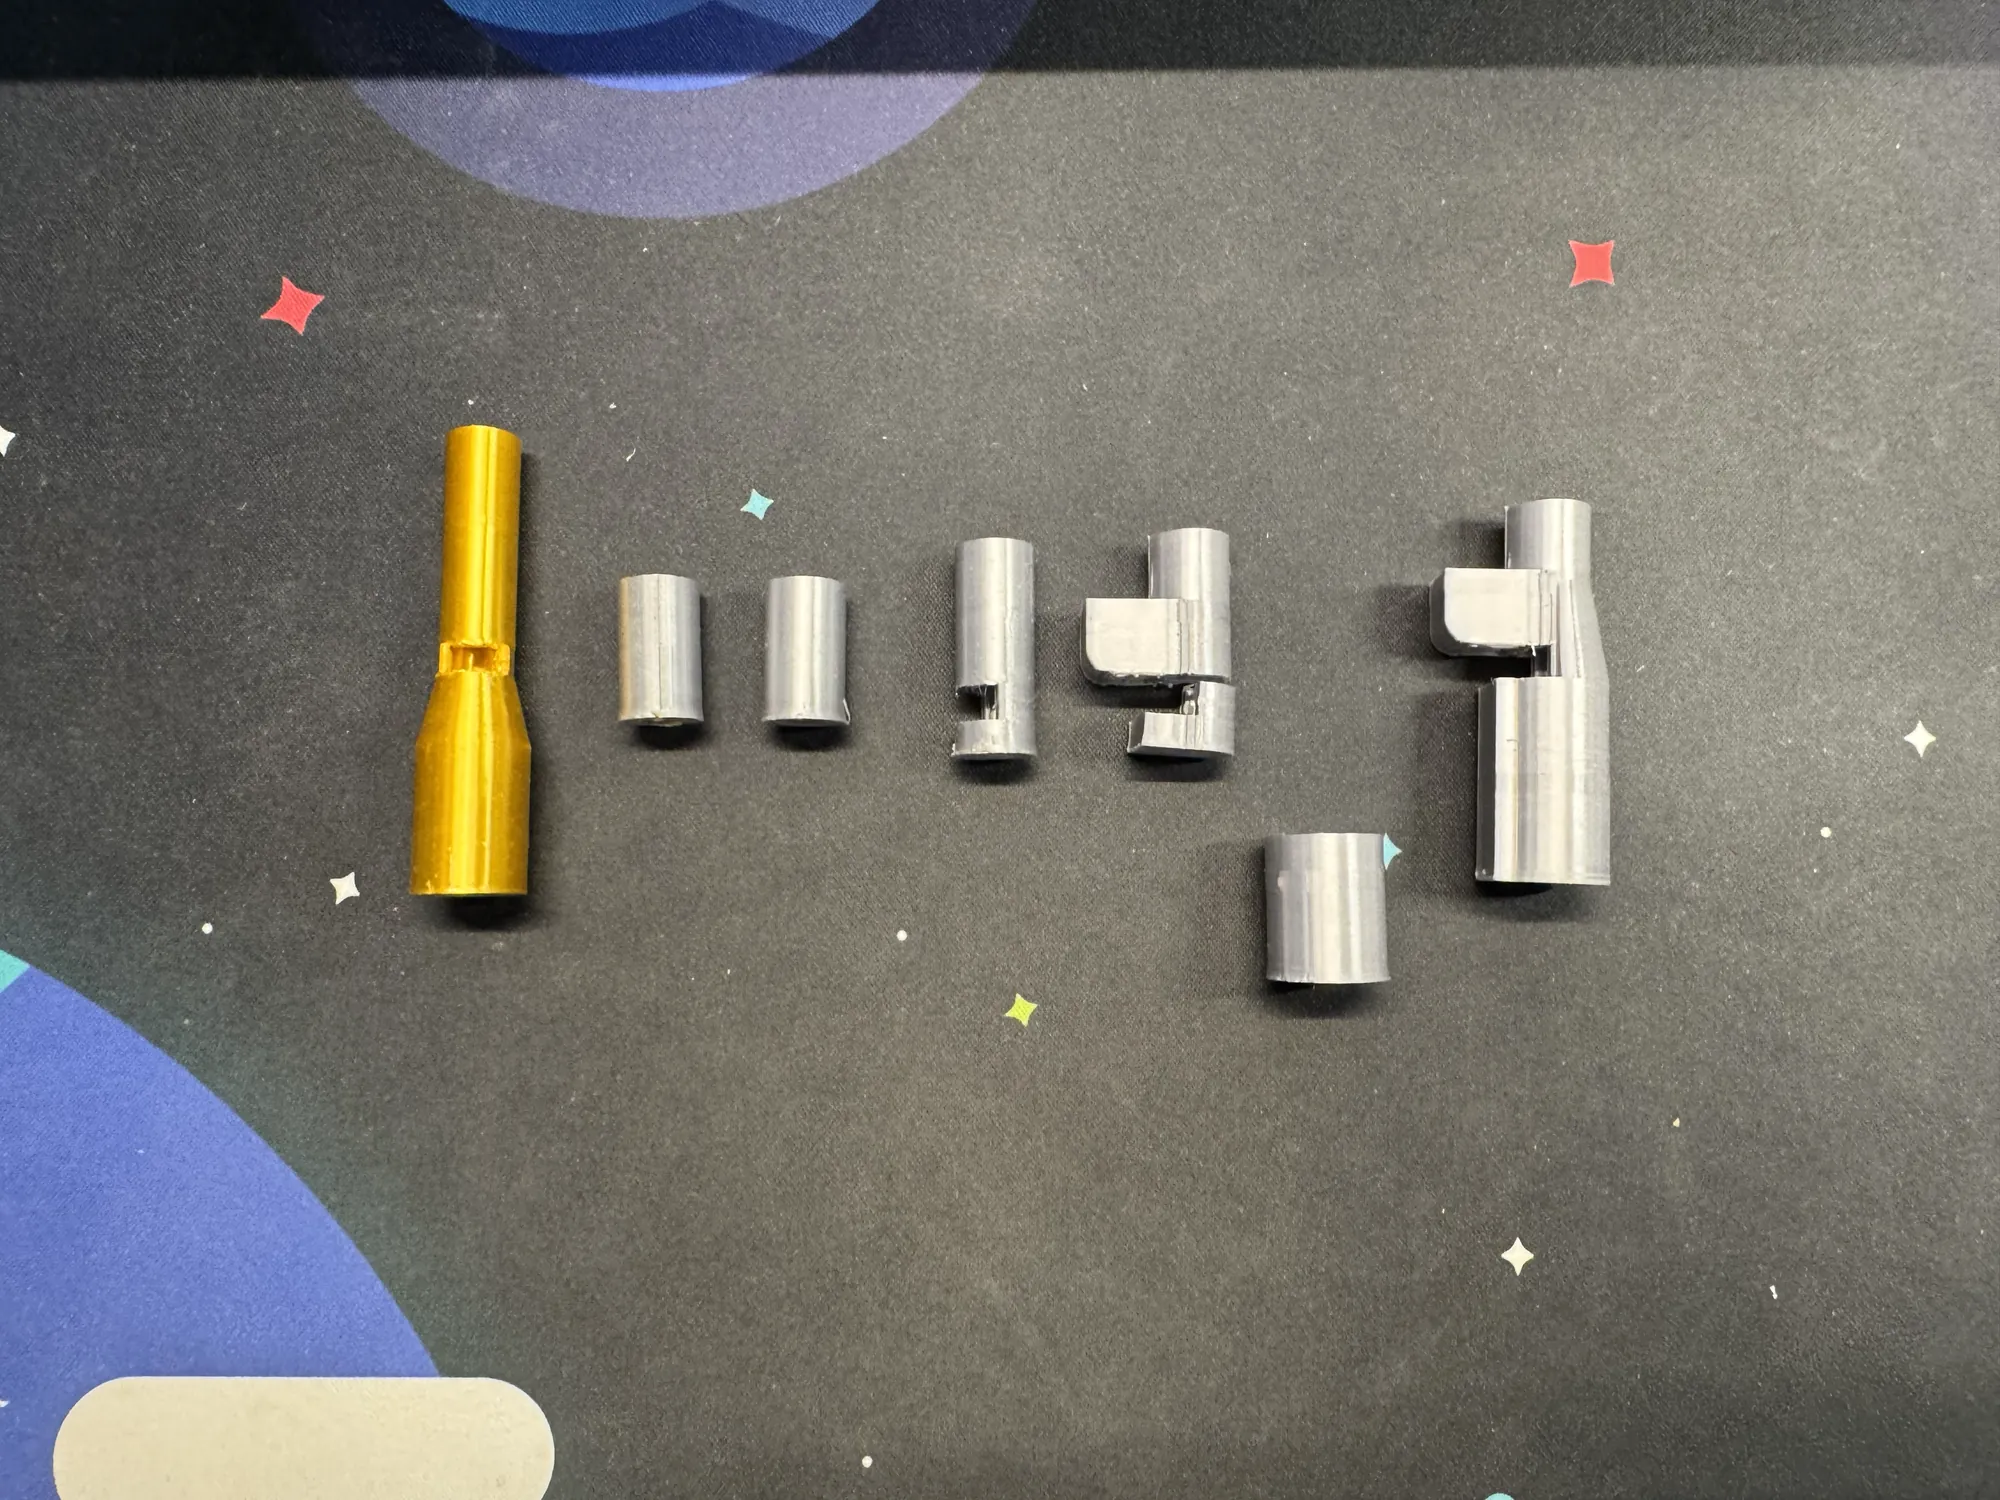
Barrel versions in a row: the gold freshman barrel, then grey test prints growing into the final v5 barrel.
Freshman barrel in gold, then every rebuild version through to v5.

Outer casing

Freshman → v1 → v2 → v3 → v4 (final)

This component didn't exist at all in the freshman build. Back then, the whole thing was just strapped to a cardboard base.

  1. Freshman

    No casing at all: the printed barrel was just taped and strapped to a cardboard wrist mount.

  2. v1

    Held small-scale barrel tests only.

  3. v2

    Expanded to hold the complete final barrel.

  4. v3

    Expanded again to add holes for a Velcro strap (secures it to the wrist), some aesthetic detailing, and a curve that actually matches the shape of a wrist.

  5. v4 · final

    Fixed a real problem. The casing has two parts, one that holds the barrel and one that secures it in place on top, connected via magnets. The thin bridge piece connecting the two sides of the top part kept snapping from the force of removing it against the magnets. Solution: removed the bridge entirely and split it into two fully separate parts, each cradling one side of the barrel independently. Also resolved an issue with the barrel sitting awkwardly in the casing around the stopper's pull-string.

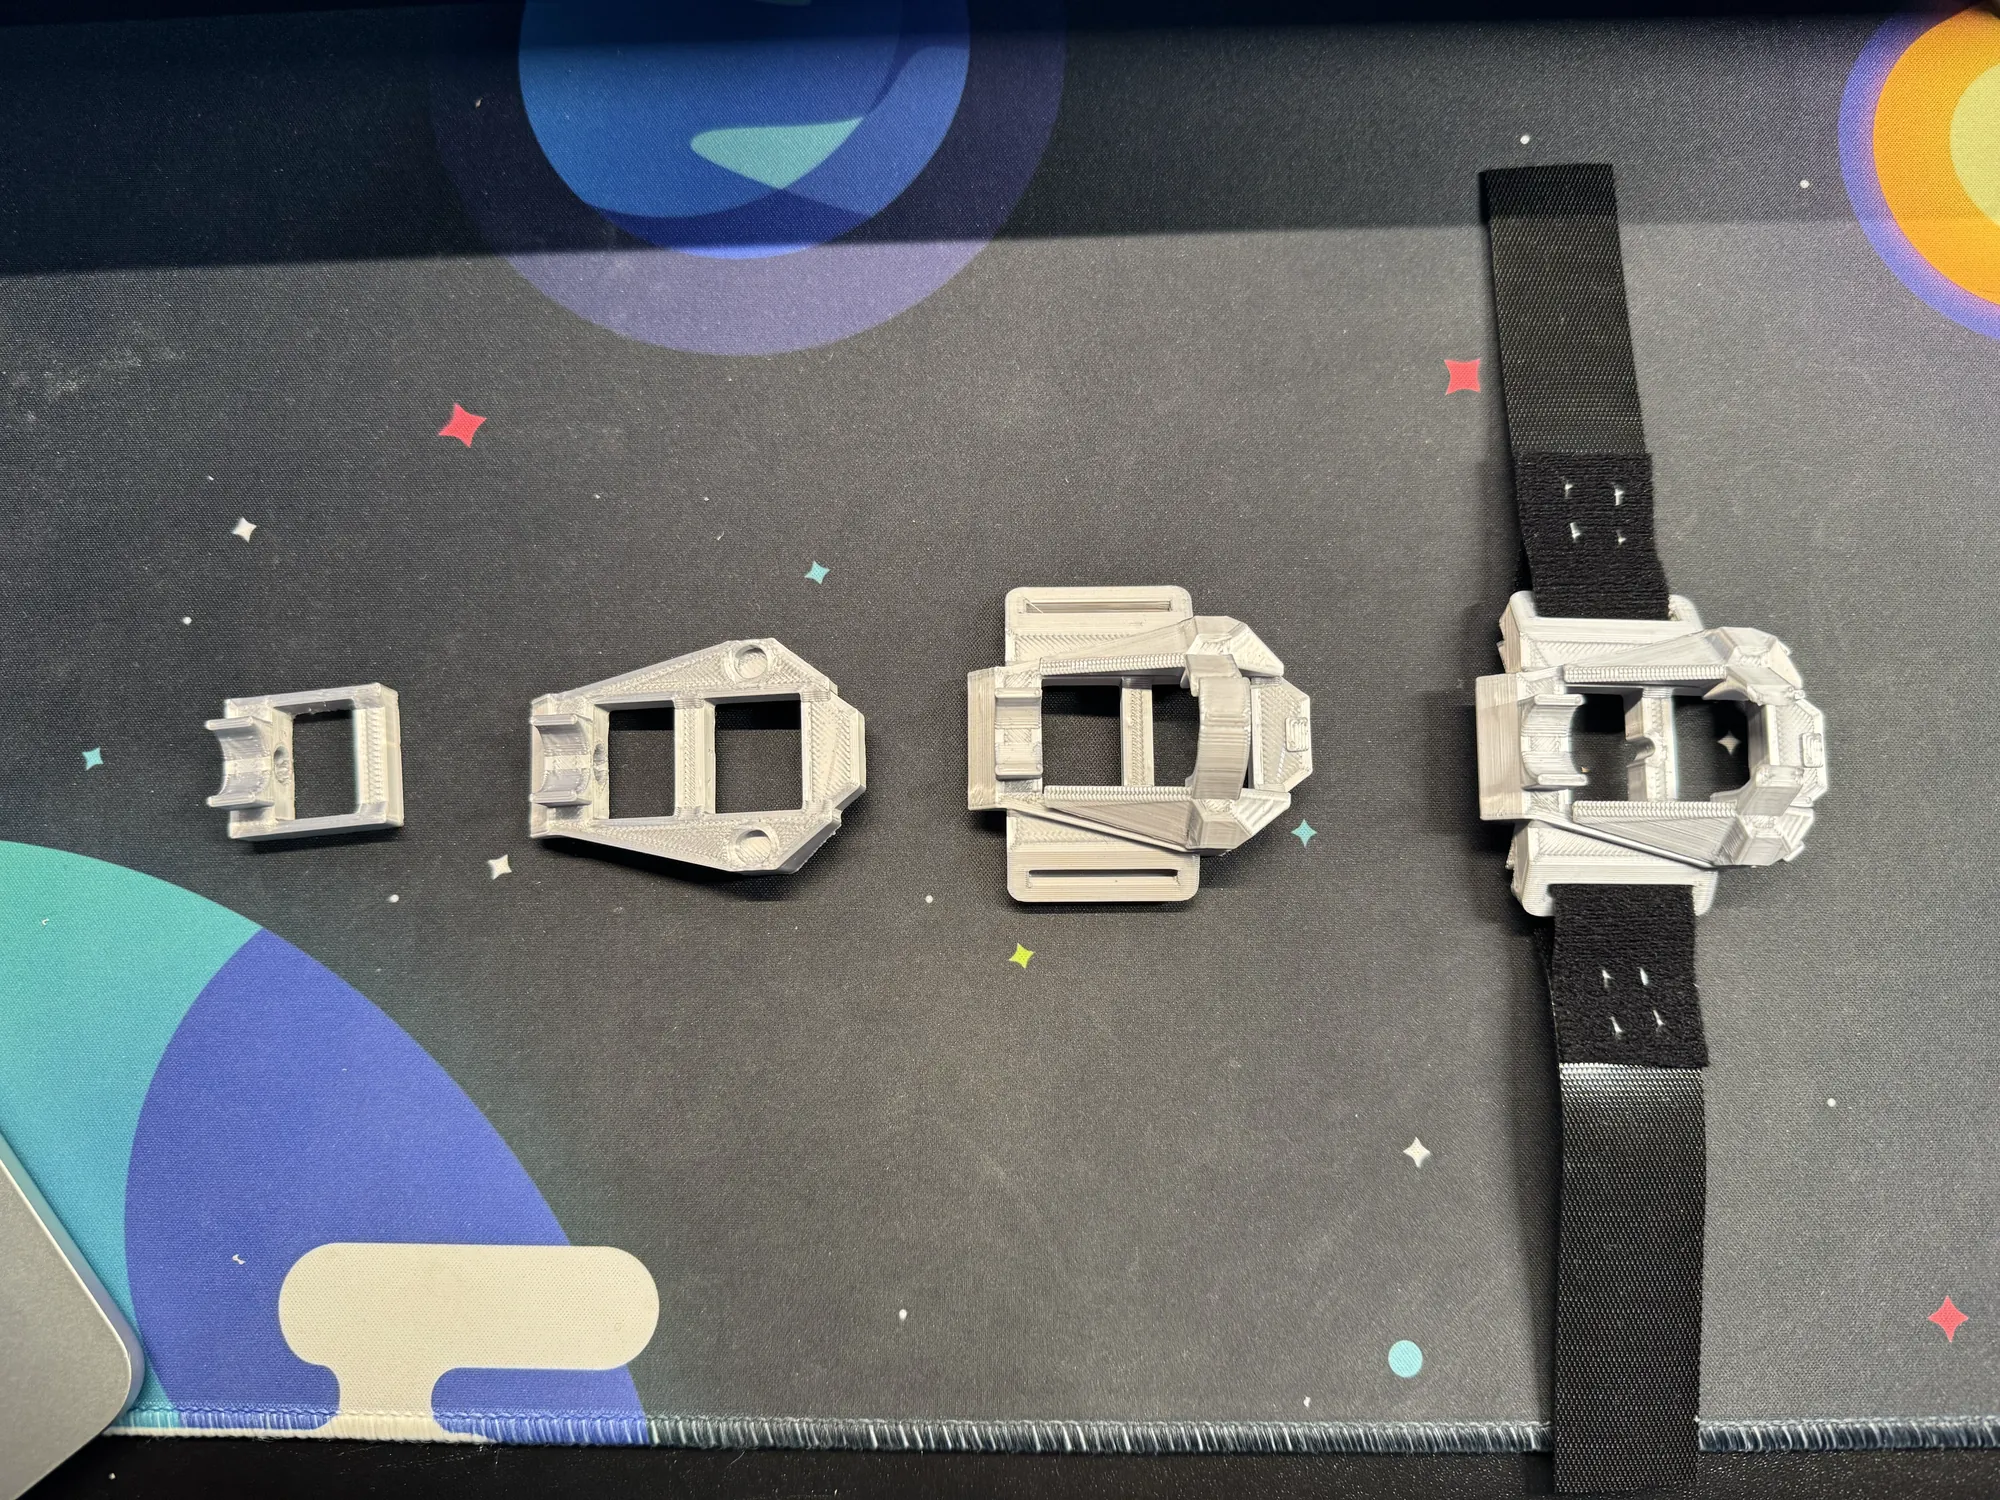
Four grey casing prints, left to right from a small test frame to the final casing on its black Velcro strap.
Casing v1 to v4, left to right. The final one is on its Velcro strap.

Bullet

Freshman → v1 → v2 (final)
  1. Freshman

    Original bullet shape, with an abrupt internal opening. Snapped after a single firing.

  2. v1 → v2 · final

    Rounded the inside edges for better adhesion against the stopper and a less abrupt catch point. Resized to match the spring's exact compression amount.

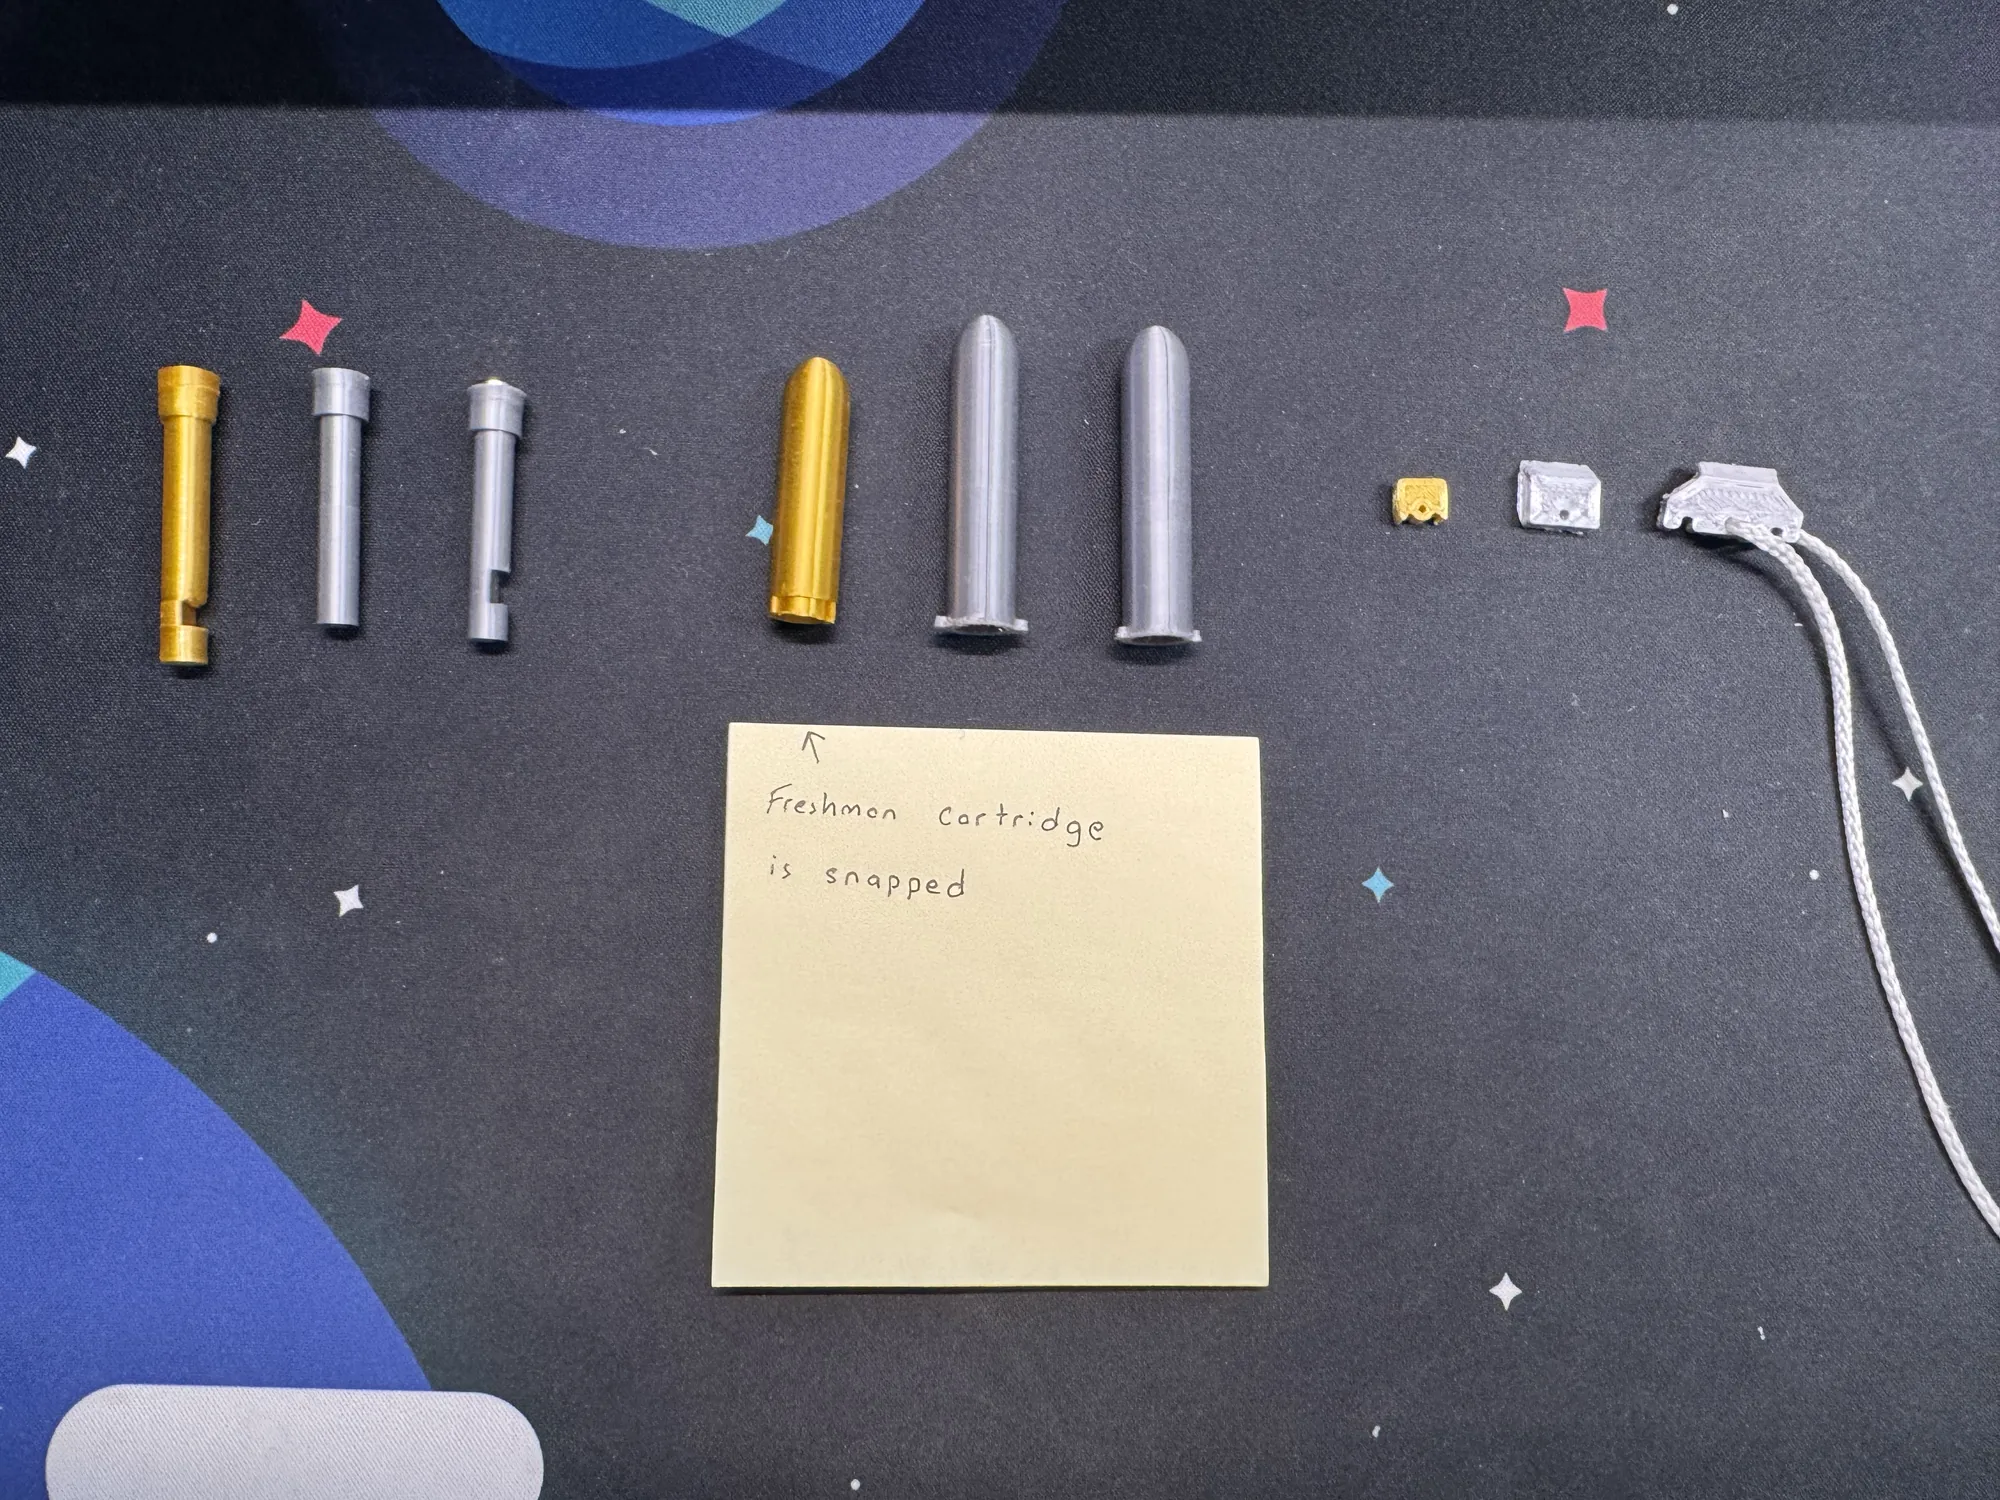
Three groups of parts, freshman versions in gold beside the grey rebuilds: bullets, cartridges and stoppers. A sticky note reads: Freshman cartridge is snapped.
Bullets, cartridges and stoppers: freshman in gold, rebuild in grey. The sticky note says it all.

Cartridge

Freshman → v1 → v2 (final)
  1. Freshman

    Had the twist-lock grooves cut directly into the cartridge itself, which made it a structural weak point. Almost always snapped.

  2. v1 → v2 · final

    Removed the grooves from the outside of the cartridge entirely. The new version is a strong, plain cylinder with two small nubs that key into grooves cut into the barrel instead. The logic: the barrel is already big and strong, so there's no reason to weaken the cartridge when the barrel can take the structural hit instead.

Three groups of parts, freshman versions in gold beside the grey rebuilds: bullets, cartridges and stoppers. A sticky note reads: Freshman cartridge is snapped.
The middle group: the snapped gold freshman cartridge, then v1 and v2.

Stopper

Freshman → v1 → v2 (final)
  1. Freshman

    Super small, with a very small rubber band system. Held less reliably.

  2. v1 → v2 · final

    Made bigger and beefier overall. Added the ability to hold rubber bands in place, and designed it to inject into a groove in the bullet once the bullet is inserted, then release cleanly when the string is pulled.

Three groups of parts, freshman versions in gold beside the grey rebuilds: bullets, cartridges and stoppers. A sticky note reads: Freshman cartridge is snapped.
Far right: the tiny gold freshman stopper, then v1, then v2 with its pull string.
05

Build pipeline

Everything was designed in Blender, printed on a Flashforge Adventure 3, in PLA. Since every part is interconnected, I didn't design things in total isolation. The actual workflow:

  1. 1

    Master file

    Build and iterate everything inside one master Blender file, NewWebshooterWorkspace, since changes to one part often affect another.

  2. 2

    Own file

    Once a part is finalized, copy it into its own dedicated Blender file.

  3. 3

    Export

    Export to STL.

  4. 4

    Repair

    Pull into 3D Builder to repair the mesh. It catches irregularities before they can cause slicer bugs. Genuinely a huge time-saver.

  5. 5

    Slice

    Re-export, load into the slicer, slice.

  6. 6

    USB

    Export the sliced file and load it onto a USB stick.

  7. 7

    Print

    Walk it over to the printer. Print.

Webshooter V2/
├─ Blender files/
├─ STL files/
├─ Sliced (gx) files/
└─ Archive: freshman-year Blender files/

Everything's organized into three folders: Blender files, STL files, and sliced (gx) files. The old freshman-year Blender files live in a separate archive folder. I referenced them briefly just to understand how the old system worked, but didn't dig through all of them.

Print specs
Filament
PLA
Walls
4
Infill
100%
Layer height
0.2mm
Fan speed
60%
Printer
Flashforge Adventure 3
Hardware
25.0mm · relaxed
Spring
7.5mm OD × 0.7mm wire × 25mm. The entire internal geometry of the webshooter is built around this spring compressing down to exactly 1cm.
Magnets
6×3mm and 5×3mm, for the barrel-to-casing mount and the bullet-to-cartridge string coupling.
String
The same type is used both for the “web” that fires and for pulling the stopper. Just two separate pieces of it.
06

By the numbers

22
Total printed pieces
1
Full spaghetti disaster
2 weeks
Build time, every day
≈10 ft
Approximate firing range
Print failure · resolved

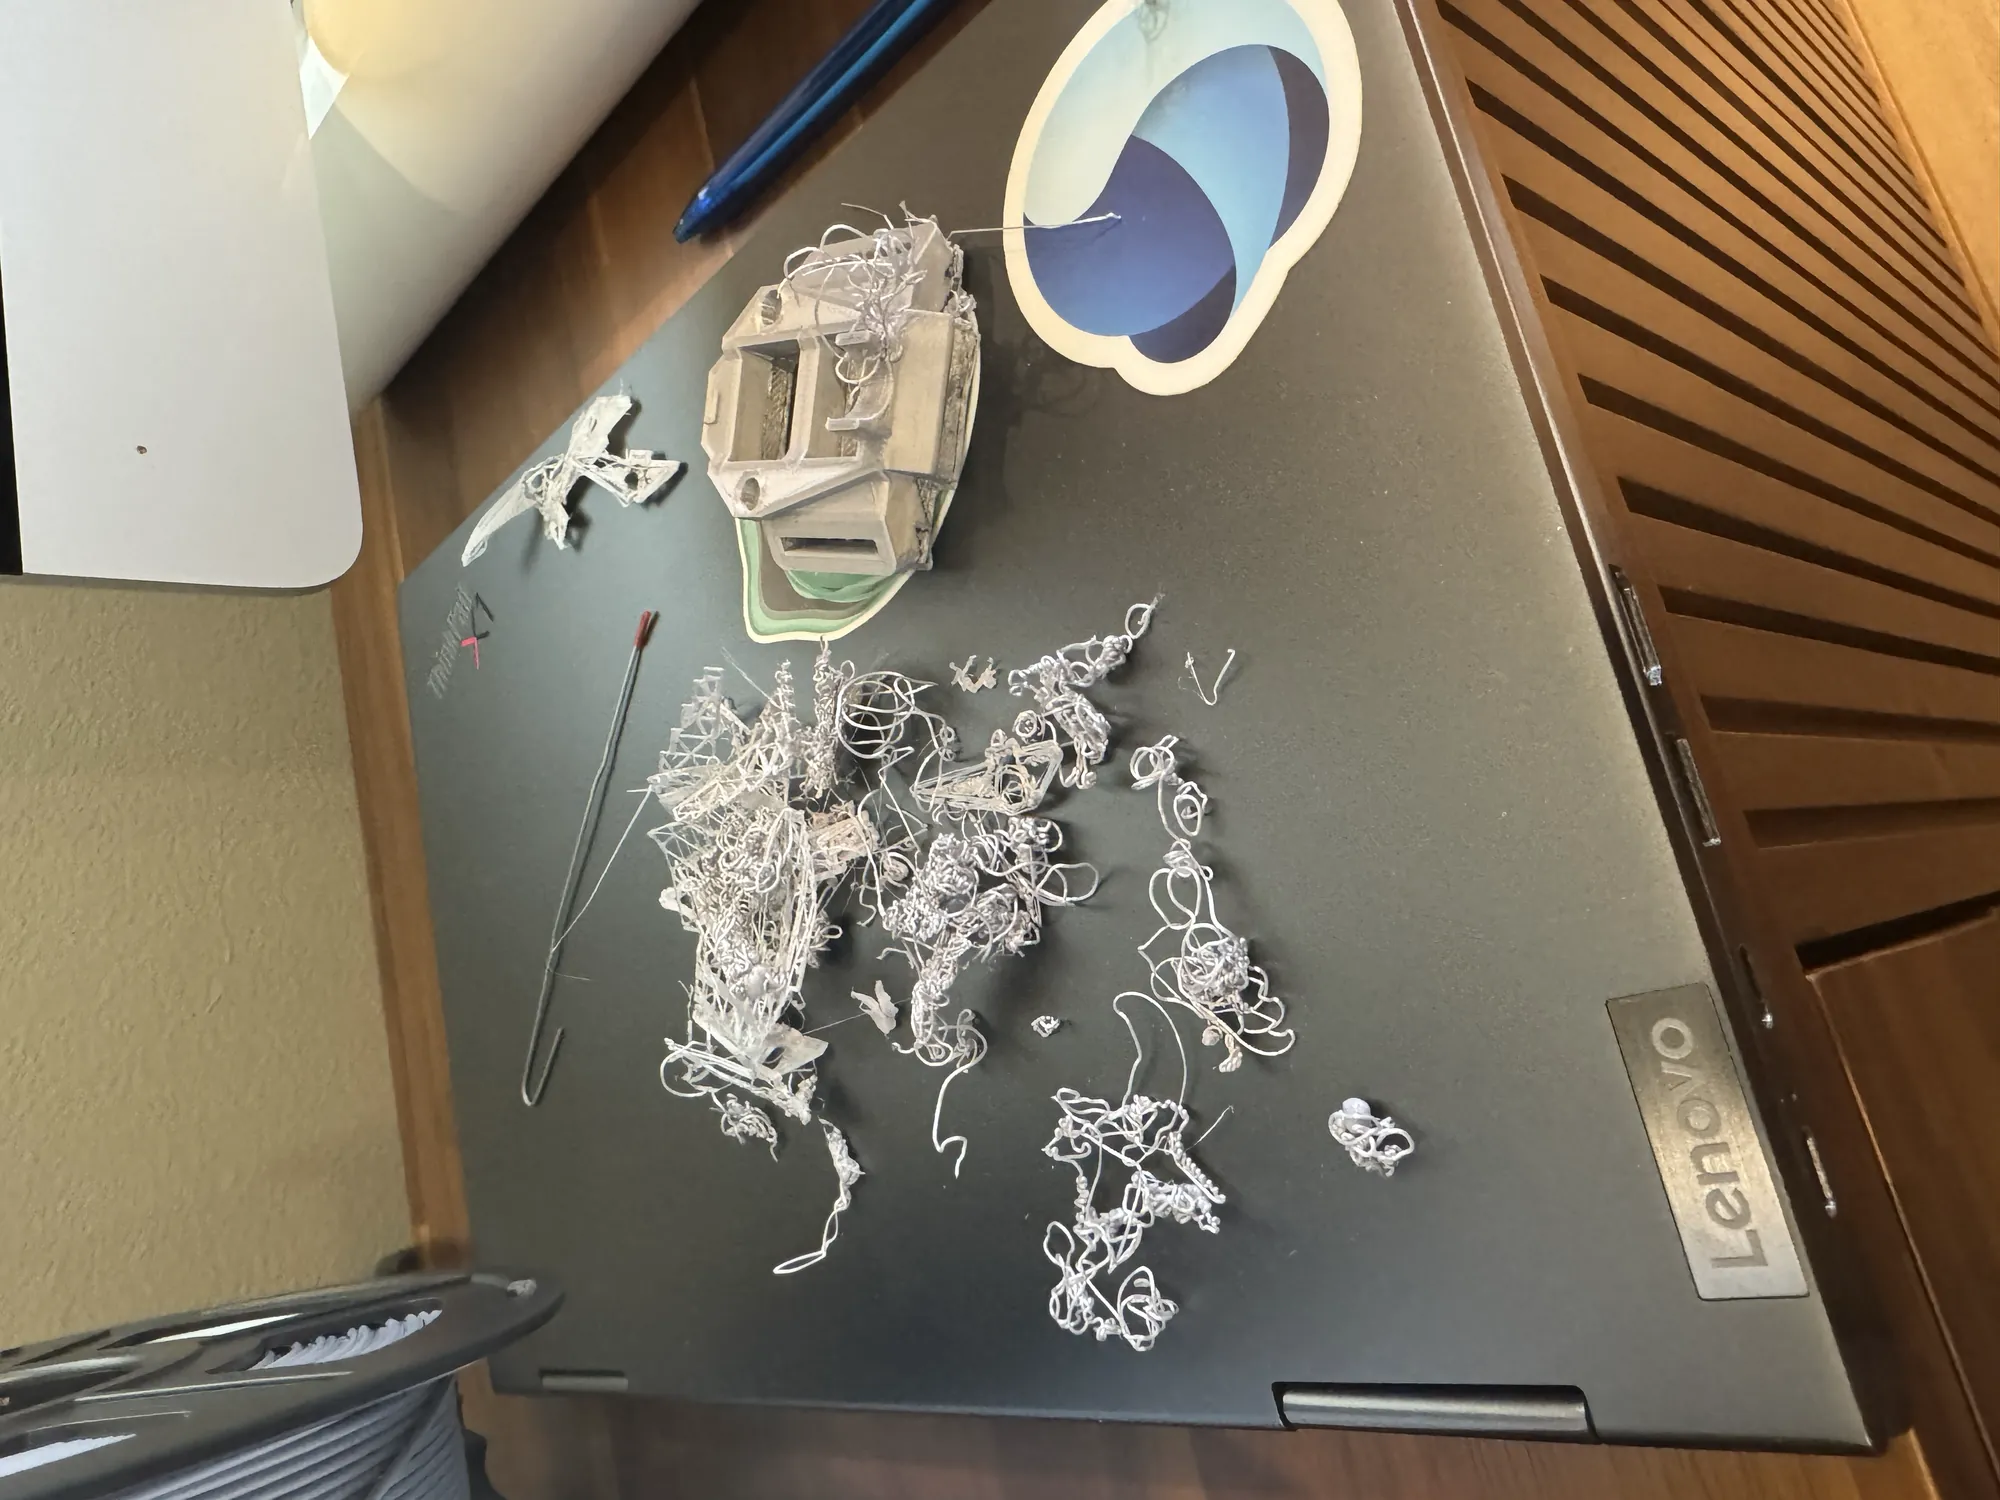
The one that went to spaghetti

Part
The top piece that seals the barrel into the outer casing.
Symptom
Kept failing from bed adhesion. It would lift mid-print and turn into a full spaghetti mess.
Attempt 1
Tried again. Same failure.
Attempt 2
Recalibrated the printer. Still failed.
Fix, part 1
Washed the build plate with soap, dried it, and laid down a thin layer of glue stick before printing. That alone made a big difference.
Fix, part 2
The two pieces were originally combined into one print, eating up too much bed space together. Splitting them into separate prints and keeping them centered on the bed solved the rest of it.
A tangled heap of failed grey filament spaghetti next to a casing part on a laptop.
Exhibit A.
07

It works: reliability vs. freshman year

The freshman version had real, recurring failures. This version fires multiple times in a row with nothing breaking.

PartFreshman yearV2
BulletSnapped after a single firingInside edges rounded, resized to the spring
BarrelSnapped under light pressure, weaker with every shotReinforced where pressure actually builds
CartridgeAlways too weak to trustRebuilt as a solid cylinder
CasingThe top part's bridge kept snappingSplit into two separate parts

Every problem that plagued the original has been solved at the source. It's not a patch job. It just doesn't fail anymore.

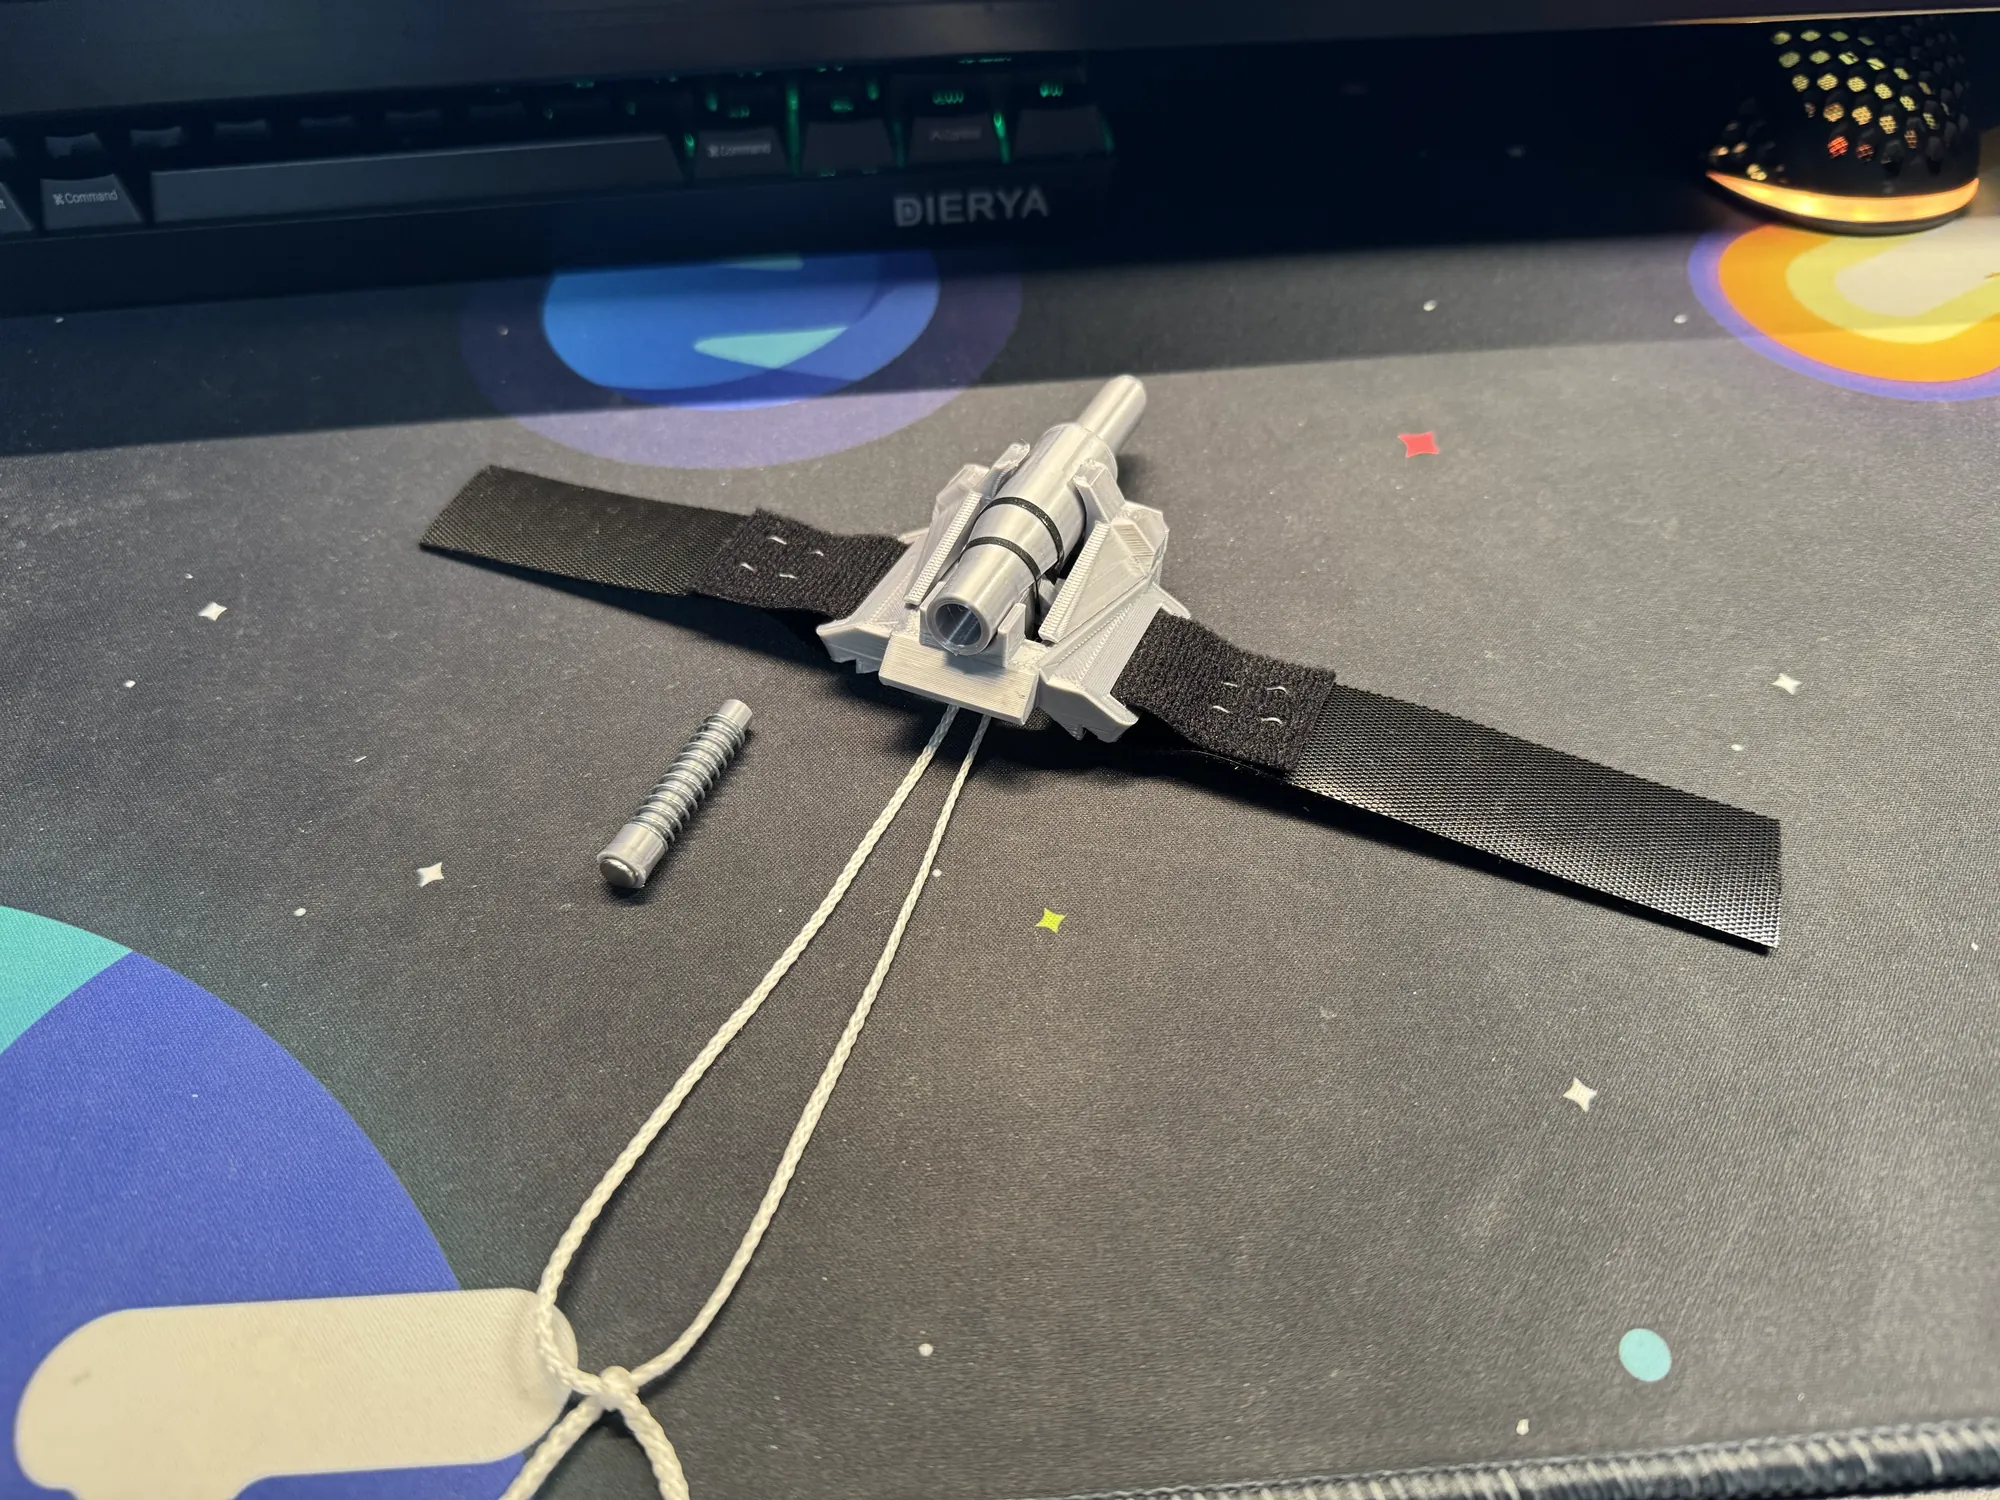
The assembled V2 webshooter on its black Velcro strap, lying on a desk mat beside a spare bullet and spring, pull strings trailing.
The finished V2 on its Velcro strap.
08

Stories from the build

The sketch that didn't come into existence

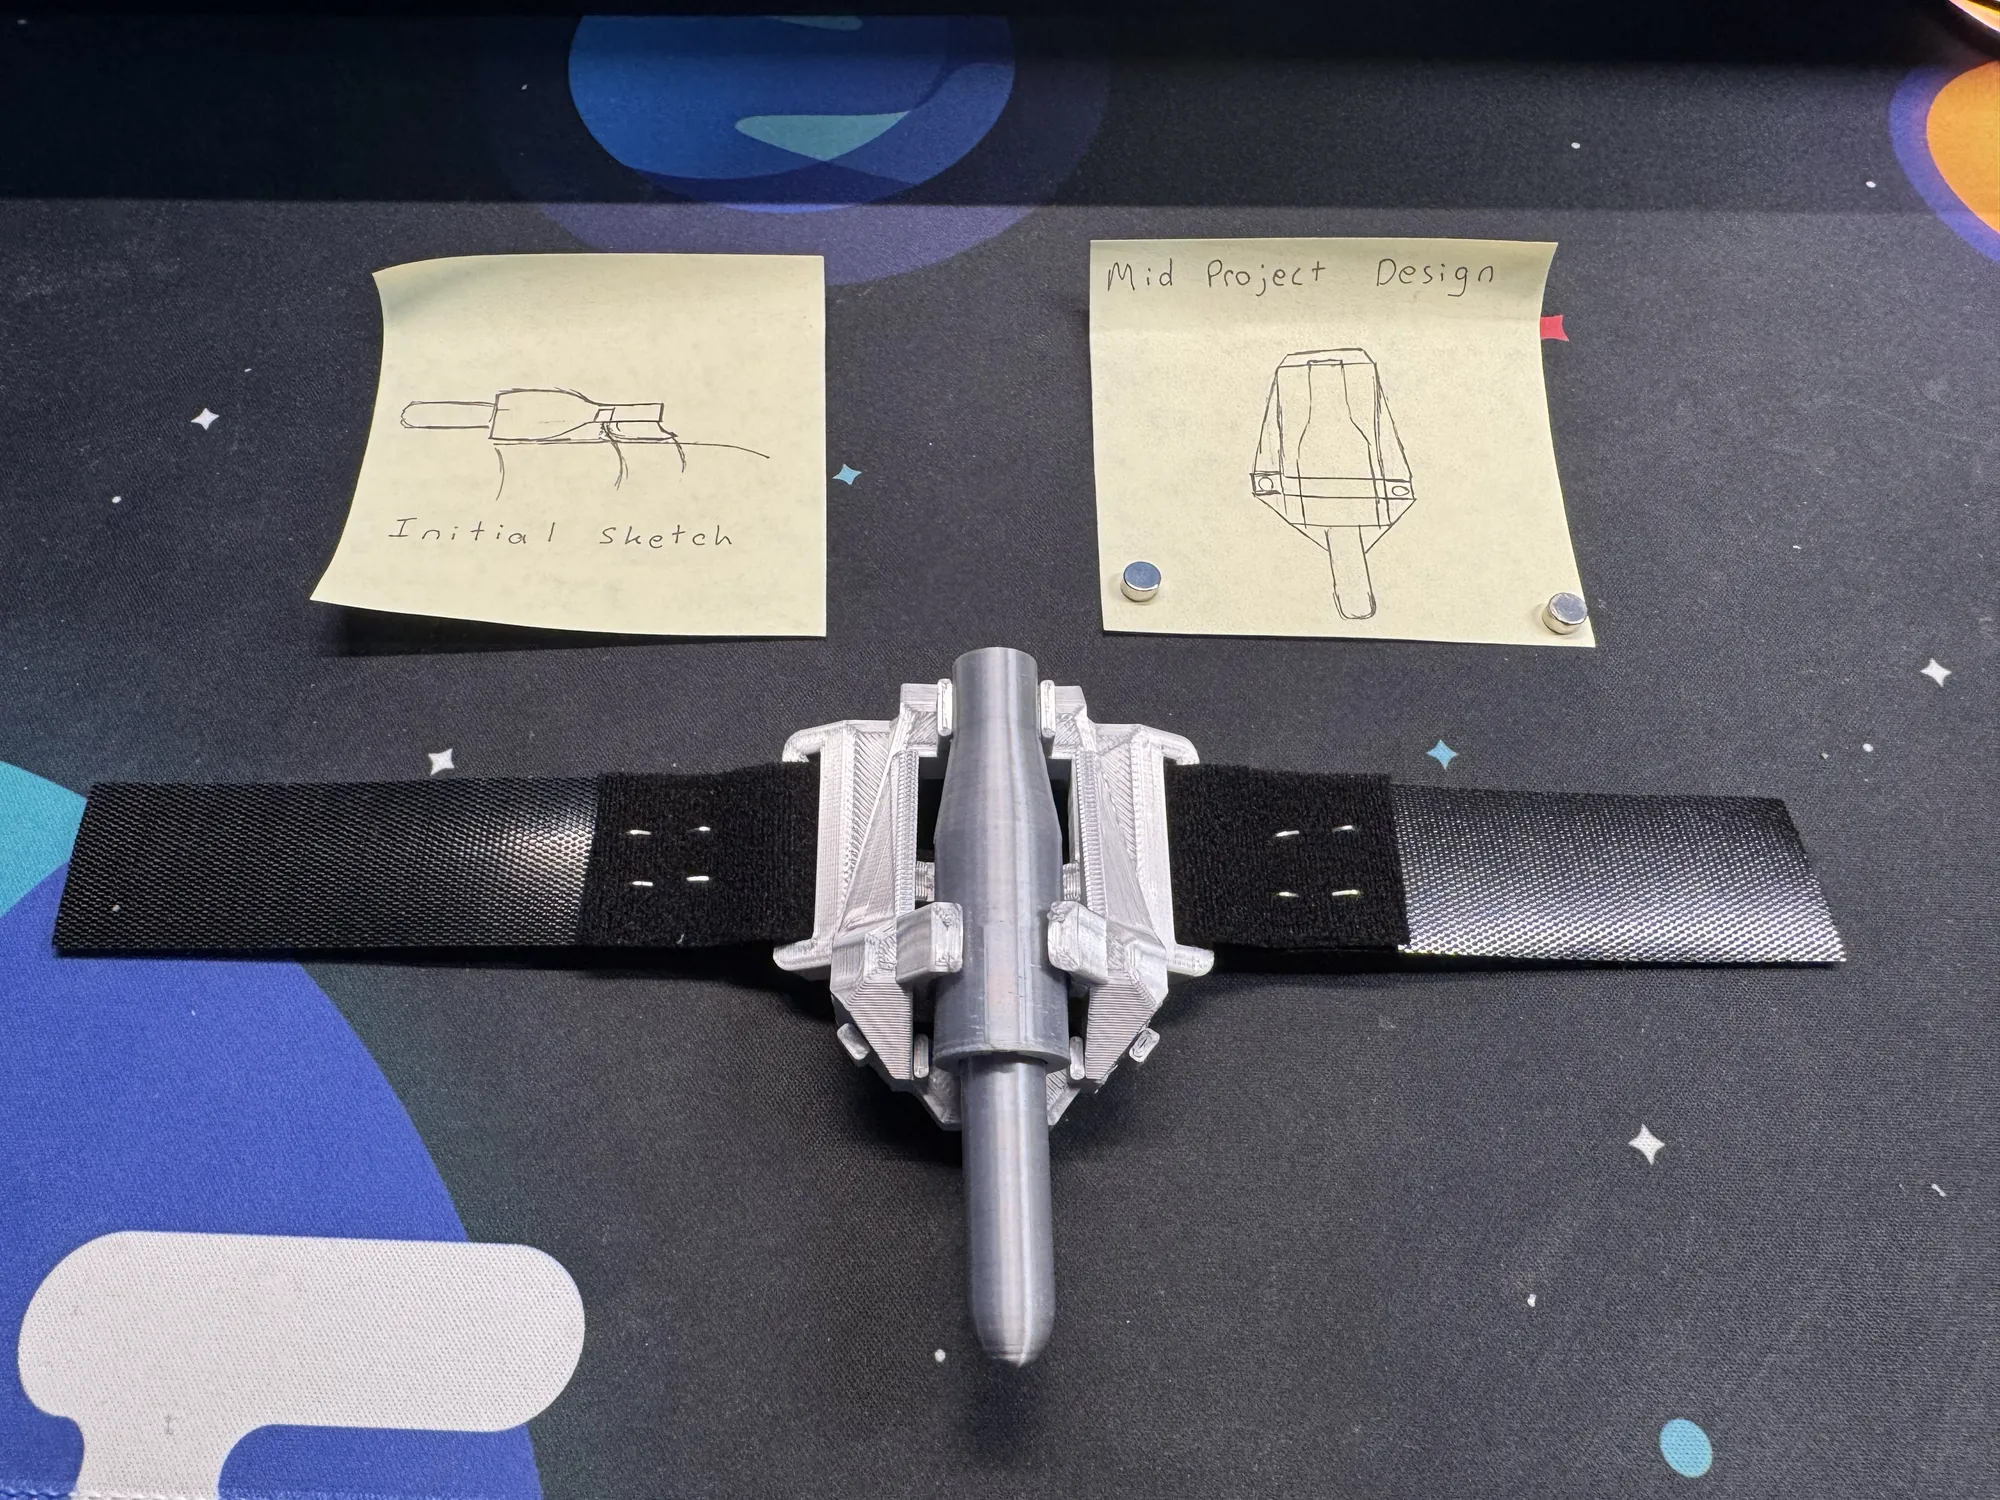
I remember sitting down early on in this project, right after digging through what was left of the freshman build, and sketching out on a sticky note what I thought the new version should look like. Felt like a solid plan at the time. By the time I actually finished the rebuild, the real thing looked almost nothing like that sketch. Basically nothing carried over except the general idea of making it bigger and stronger. Every real decision happened later, in Blender, one version at a time.

Two sticky notes above the finished webshooter: one labelled Initial sketch, the other Mid Project Design.
Left: the initial sketch. Right: the mid-project design. Below: what actually got built.

The sketch that did

A separate sketch, one I did of the barrel and outer casing together later into the project, went the complete opposite way. I followed it almost exactly. I still look at that piece of paper next to the final 3D print, and it's like I'd already solved the design before I ever opened Blender.

The superglue smell

Putting the magnets in meant supergluing them into place, and the second I cracked that bottle open, the smell hit me and I was straight back in freshman year. I remember gluing my fingers together more times than I can count back then, constantly stuck trying to wrangle those magnets into place. This time, doing the literal same task, I didn't glue my fingers once. Same smell, same project, completely different hands. It really made me laugh.

Freshman year's first fire

I remember the first time the freshman webshooter actually fired, and it broke completely doing it. Didn't even care. I was just so happy it worked at all that watching it destroy itself in the same motion didn't bother me one bit.

Fired once. Broke.
This version's first fire

This time was different. I remember pulling the string and it just fired, clean. Then I did it again. And again. Nothing cracked, nothing snapped. After two weeks of taking this thing apart piece by piece and rebuilding each one from scratch, that was the moment it actually felt done.

Fired. Again. And again.
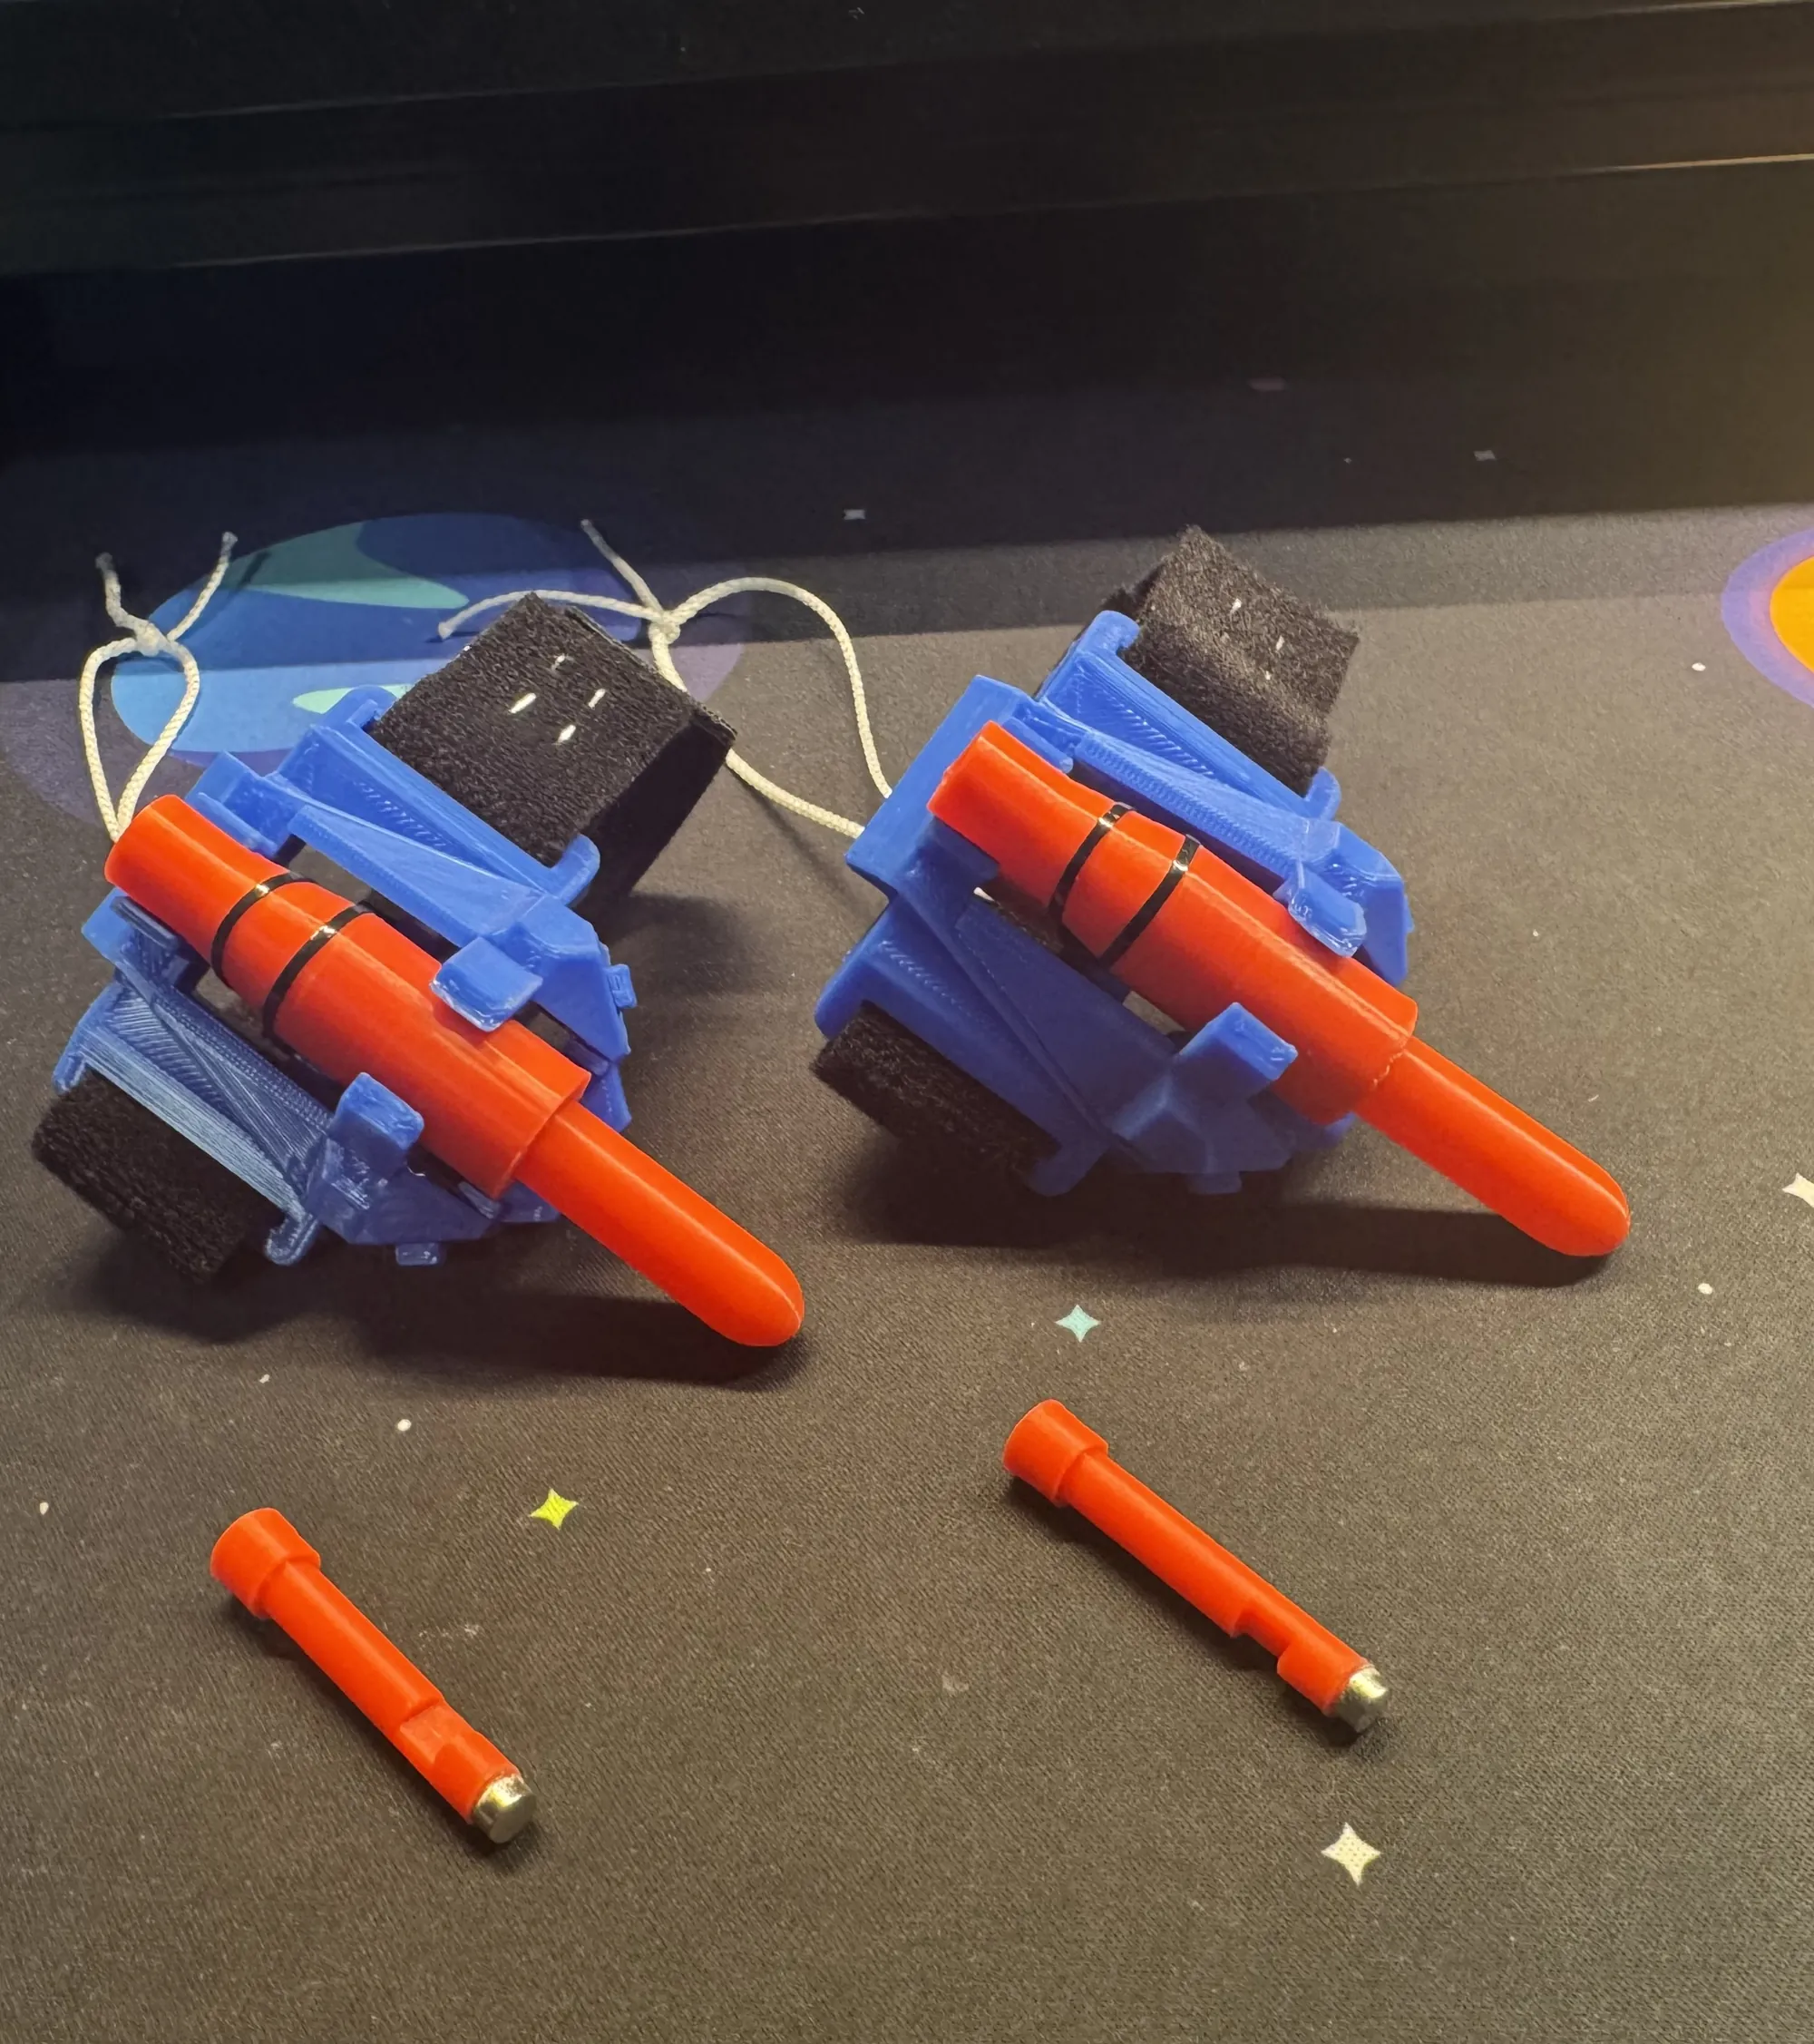
Two finished webshooters side by side: blue casings, red barrels, black Velcro straps and white pull strings, with two spare red bullets in front showing the magnets on their tips.
09

The finished pair

After two weeks of grey test prints, the final build, twice over: a matching pair in Spider-Man red and blue. One for each wrist.

  1. Barrel The part that went through seven versions, now reinforced where the spring pushes hardest.
  2. Outer casing Curved to fit a wrist, split so nothing snaps when it comes apart.
  3. Velcro strap Threaded through the holes added in casing v3.
  4. Pull string One tug and the stopper lets go.
  5. Spare bullets Magnets glued into the tips, ready to catch the web string.

Why this project matters

Beyond just being a fun build, this is proof I'm still the kid who looked at Spider-Man's webshooters and wondered how they worked, and that I can take something I saw on TV and actually build it with my own hands and my own brain.

Real results. Not just an idea I talked about. Something that actually works.

← Back to all projects